

Table of Contents
- Why Inspect for Signs of Wear on Used Excavators
- Visible Damage, Rust, and Structural Deterioration
- Used Excavator Hydraulic Problems and Fluid Condition
- Hydraulic Hoses, Lines, and Cylinder Connections
- How to Inspect an Excavator Undercarriage
- Excavator Track Wear Patterns and Tension Issues
- Engine Condition, Noises, and Performance Indicators
- Bucket, Teeth, and Attachment Wear Assessment
- Used Excavator Inspection Checklist for Buyers
- Distinguishing Normal Wear from Abuse and Imminent Failure
- Frequently Asked Questions
Last Updated: October 10, 2026
Why Inspect for Signs of Wear on Used Excavators
When buying a used excavator, surface appearance masks hidden wear. Hydraulic systems, undercarriages, and engines accumulate wear patterns that reveal how hard the machine has worked. Understanding the signs of wear used excavators display is the difference between a reliable workhorse and expensive repair bills.
The signs of wear used excavators display, hydraulic leaks, track tension issues, rust patterns, engine noise, are diagnostic clues. Even wear across all systems indicates premium value; abuse, neglect, or hidden damage requires aggressive negotiation or rejection.
Why use a Heavy Equipment Broker when buying used machinery? Purchasing without proper inspection risks inheriting hidden damage that compounds into costly repairs. A Heavy Equipment Broker connects you with sellers who understand machine condition and helps you make informed decisions about value, preventing costly oversights. They can also guide you through the inspection process and help you negotiate based on the wear patterns and repair costs you identify.
This guide provides a systematic inspection process to distinguish normal wear from imminent failure, prioritize negotiation points, and identify red flags.
Visible Damage, Rust, and Structural Deterioration
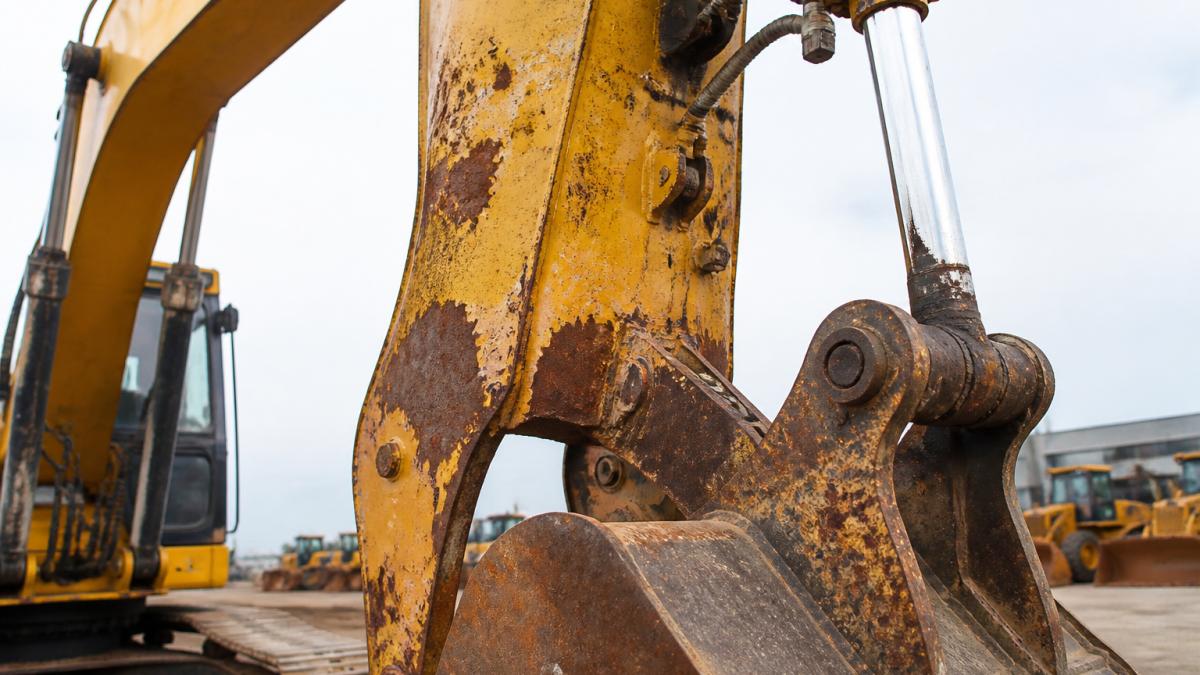
Start from the outside. Paint chips and surface rust are cosmetic; deep rust, structural cracks, and bent frames are serious problems that compound and impact resale value.
Assessing Rust Severity
Rust appears in three stages: surface rust (flakes away easily, normal on used equipment), pitting rust (craters deeper than 1/16 inch indicate ongoing corrosion), and deep rust (thinned metal, through-holes, requires welding repair).
Test suspect areas with a wire brush. Rust concentrated in water-collection zones (cab base, counterweight, undercarriage) is common; rust on load-bearing components (boom, stick, main frame) is more concerning.
Structural Cracks: Detection and Severity
Structural cracks appear as dark lines from welded joints. Small surface cracks in non-critical areas are manageable; cracks longer than 2 inches in load-bearing members (boom, stick, main frame) are deal-breakers.
Run your finger along cracks: surface-level cracks are cosmetic; deep cracks that catch your nail or branch are structural concerns. Compare photos to maintenance records to assess if the crack is new or growing.
Frame Bending and Alignment
Check the undercarriage frame for bending using a straight edge or level. Any visible bow or twist indicates overloading or repeated drops and accelerates wear elsewhere.
Minor bends (less than 1/4 inch over 3 feet) may be cosmetic. Bends greater than 1/2 inch require frame straightening. Walk away from severe bends unless the price reflects a complete rebuild.
Bucket and Attachment Damage
Dents are normal wear. Bent bucket teeth are expected and cheap to replace. A bent bucket indicates overuse or dropping and reduces efficiency; replacement is costly.
Teeth should be firmly seated with no rattle. Check for cracks around tooth pockets and bottom corners; cracks propagate quickly under load.
Prioritizing Visible Damage in Negotiation
Separate cosmetic wear from functional risk in negotiation. Surface rust is appearance-only; pitting rust is maintenance; structural cracks and frame bending are functional risks that should reduce your offer by full repair cost or trigger rejection.
Used Excavator Hydraulic Problems and Fluid Condition
Hydraulic systems are the heart of any excavator and the most expensive to repair.
Check hydraulic fluid level on the dipstick. Low fluid signals leaks or neglect.
Examine fluid color and smell. Amber or light yellow is normal; dark brown or black indicates oxidation; burnt smell indicates overheating; milky fluid indicates water contamination.
Feel the hydraulic tank with your hand. It should be warm but not hot. A tank that's hot to the touch means the system is overworking, likely due to internal leaks or worn pump seals.
Hydraulic Hoses, Lines, and Cylinder Connections
Examine every visible hose and line. Hydraulic leaks are the most common failure point on used equipment. Even small weeps compound into major system failures.
Look for wet spots or residue around hose connections, fittings, and cylinder ports. Hydraulic fluid is slippery and leaves a distinctive sheen. Wipe a hose clean with a rag, then check again after the engine idles for five minutes. New wetness means an active leak.
Check hose condition visually. Cracks, bulges, or hardened sections indicate age and UV damage. Hoses typically last several years regardless of use. Machines with original hoses from a decade ago need hose replacement budgeted into your purchase price.
Trace each hose from source to connection. Hoses routed against sharp edges, hot surfaces, or moving parts will fail prematurely. Poor routing isn't a deal-killer, but it tells you the machine wasn't maintained with care.
Cylinder connections are critical. Check the rod seals where the cylinder rod enters the cylinder body. A thin film of oil is normal. Visible dripping or pooling fluid means rod seal failure.
How to Inspect an Excavator Undercarriage
The undercarriage, tracks, rollers, idlers, and sprockets, supports the entire machine. Undercarriage repairs are expensive and labor-intensive.
Start with the tracks. They should be tight but not rigid. Grab the track midway and try to lift it. It should move 1-2 inches. Excessive slack means pin and bushing wear. Tracks that don't move at all are over-tensioned and will wear faster.
Look at the track surface. Pads should have visible tread or texture. Smooth, shiny pads indicate heavy wear. Cracked or missing pads need replacement. Count how many pads are damaged. One or two is acceptable. Multiple damaged pads suggests the machine has been worked hard.
Inspect the sprocket teeth. They should be symmetrical and sharp-pointed. Hooked or rounded teeth mean the sprocket is worn and should be replaced. A worn sprocket accelerates track wear, creating a cascading failure pattern.
Check the idler wheels and rollers for cracks or flat spots. Spin them by hand, they should rotate freely. Seized or rough-spinning rollers indicate bearing failure.
Excavator Track Wear Patterns and Tension Issues
Track wear tells the story of how a machine has been operated. Even wear across all tracks suggests consistent, controlled work. Uneven wear signals abuse or poor maintenance.
Examine both sides of the machine. Do both tracks show similar wear patterns? If one side is significantly more worn, the machine may have been operated in circles or under heavy side-loading. This stresses the swing bearing and hydraulic system unevenly.
Look at wear distribution along the track length. Wear concentrated at one end suggests improper tension or misalignment. Wear concentrated in the middle suggests the machine spends most time under load in neutral gear, typical for production machines.
Check for missing or broken track links. A few missing pads are normal. Broken or cracked links require replacement. A chain with multiple broken links needs complete replacement.
Measure track tension if possible. Most excavators have a wear indicator mark on the track frame. The track should sit within the marked zone. Tracks outside that zone are either over-tensioned (accelerating wear) or under-tensioned (risking derailment).
Engine Condition, Noises, and Performance Indicators
Engine condition is one of the most expensive systems to repair on an excavator. A complete engine overhaul or replacement can be a significant investment depending on damage extent and machine size. A systematic engine inspection, cold start, warm-up, load test, and shutdown, reveals whether you are buying a reliable power plant or inheriting a ticking time bomb.
Cold-Start Inspection
Start the engine cold (after the machine has sat for at least 2 hours) and listen carefully for unusual sounds. A healthy engine starts smoothly with minimal noise, typically cranking for 3-5 seconds before ignition. Slow cranking (10+ seconds) suggests weak battery, corroded terminals, or starter wear, minor issues. No start or repeated failed cranking indicates fuel system, ignition, or compression problems, more serious.
Once the engine fires, listen for:
- Grinding or whining during cranking: Starter motor wear or weak battery.
- Knocking or pinging immediately after start: Piston slap (piston-to-cylinder wall clearance) or bearing wear. This is a sign of internal engine wear.
- Grinding or scraping sounds: Valve train issues, timing chain slack, or camshaft wear.
- Hissing or spraying sounds: Coolant leak, often from a cracked head gasket or loose hose connection.
- Whistling or squealing: Belt slippage, worn pulleys, or alternator bearing wear.
If you hear knocking, grinding, or severe hissing during cold start, note it and proceed to the warm-up phase. Do not shut down immediately; engine noise often changes as oil pressure builds and the engine warms.
Warm-Up and Idle Inspection
Let the engine idle for 5-10 minutes and reach operating temperature (typically 160-180°F on the gauge). During warm-up, listen for changes in noise character. Knocking that disappears as the engine warms is often piston slap and indicates wear but may not be imminent failure. Knocking that persists or worsens as the engine heats is bearing wear and is more serious.
Check coolant level in the reservoir. It should be between minimum and maximum marks when cold. Low coolant suggests leaks or neglect. Rusty, discolored, or milky coolant means the cooling system has not been serviced properly or has internal corrosion. Milky coolant specifically indicates water contamination, often from a cracked head gasket or failed water pump seal.
Feel the radiator with your hand (carefully, it will be hot). It should be warm but not scalding. An ice-cold radiator means the thermostat may be stuck open, reducing engine efficiency. An overheating radiator (too hot to hold your hand on for more than 2 seconds) signals cooling system problems: clogged fins, failed water pump, or internal blockage. Overheating engines fail quickly and are expensive to repair.
Check the air filter. Open the air box and inspect the filter element. A clean or lightly soiled filter is normal. A black, caked-on, or oil-soaked filter indicates poor maintenance and reduced engine performance. A clogged air filter restricts airflow, reduces power, and increases fuel consumption. Budget for filter replacement.
Load Test and Operation
With the engine warm and idling smoothly, engage the hydraulic system and perform light digging or bucket manipulation. Listen for:
- Engine stalling under load: Weak fuel system, clogged fuel filter, or low compression.
- Excessive smoke (black, blue, or white): Black smoke indicates rich fuel mixture or fuel injector wear. Blue smoke indicates oil burning (worn piston rings or valve seals). White smoke indicates coolant burning (head gasket failure).
- Loss of power or sluggish response: Fuel system restriction, air filter clogging, or turbocharger wear (if equipped).
- Rough idle or surging: Fuel injector fouling, air leak, or governor malfunction.
Perform a brief travel test if possible. The engine should maintain steady RPM under load without stalling, surging, or excessive noise. If the machine bogs down, stalls, or makes new noises under load, the engine is compromised.
Exhaust and Emission Inspection
Observe exhaust color and smell. Clear or light gray exhaust is normal. Black exhaust indicates incomplete combustion (rich fuel mixture, worn injectors, or low compression). Blue exhaust indicates oil burning. White exhaust indicates coolant burning. Excessive exhaust smell (acrid, sulfurous, or burnt) suggests fuel system or emission control problems.
Check for visible leaks around the engine block, head, and oil pan. A thin film of oil is normal. Active dripping or pooling indicates gasket failure or seal wear. Oil leaks can be costly to repair depending on location and severity.
Shutdown and Post-Inspection
Shut down the engine and listen for knocking or grinding as it decelerates. Noises that occur only during shutdown are often valve train or timing-related and less critical. Noises that persist throughout operation are more serious.
After shutdown, check the oil level on the dipstick. Oil should be between minimum and maximum marks. Low oil suggests leaks or neglect. Dark, burnt-smelling oil indicates the engine is running hot or has internal wear. Oil color should be amber or light brown; black oil needs changing. Budget for an oil and filter change if the oil is overdue.
Engine Wear and Repair-Cost Prioritization
Normal engine wear is proportional to operating hours. An engine in light duty shows less wear than an engine in heavy duty, even with fewer operating hours. Piston slap (mild knocking during cold start that diminishes as the engine warms) is common on older machines and does not require immediate repair. Persistent knocking, grinding, or severe smoking indicates internal damage and imminent failure.
If you hear knocking or grinding that does not improve with warm-up, or if the engine stalls under load, budget for engine overhaul or replacement. If the machine shows only minor wear (clean air filter, normal idle, no smoking), the engine is likely good for another 1,000-2,000 hours of operation.
Bucket, Teeth, and Attachment Wear Assessment
Bucket condition is straightforward. Bent buckets reduce digging efficiency and can cause hydraulic strain. Minor dents are acceptable. Severe bending or cracking requires bucket replacement.
Bucket teeth wear quickly. Worn teeth reduce penetration and increase fuel consumption. Replacement teeth can be a significant cost. A bucket needing all new teeth might require a substantial investment in parts and labor.
Inspect the tooth retention system. Teeth should be firmly seated. Loose or rattling teeth mean the retention pins are worn and need replacement.
Check for cracks in the bucket itself, especially around the tooth pockets and bottom corners. Cracks propagate quickly under load and can render a bucket unusable.
Used Excavator Inspection Checklist for Buyers
Use this checklist during your physical inspection:
| Component | What to Check | Pass/Fail |
|---|---|---|
| Frame & Structure | No visible cracks; no bent rails | |
| Rust & Paint | Surface rust only; no deep pitting | |
| Hydraulic Fluid | Amber color; no burnt smell; full level | |
| Hoses & Lines | No visible leaks; hoses supple, not cracked | |
| Cylinders | No weeping at rod seals; connections tight | |
| Tracks | Tight (1-2 inch lift); pads intact; even wear | |
| Sprockets | Sharp teeth; no hooking or rounding | |
| Rollers & Idlers | Spin freely; no cracks or flat spots | |
| Engine Start | Smooth cold start; no grinding or knocking | |
| Coolant | Full level; clear or green color; not rusty | |
| Bucket | No deep bends; teeth secure; no cracks | |
| Cab & Controls | Functional; no excessive wear on levers |
Distinguishing Normal Wear from Abuse and Imminent Failure
Normal wear is proportional to operating hours and duty cycle. A machine in light duty (clearing land, moving material) shows less wear than a machine in heavy duty (digging rock, demolition), even with more operating hours.
Abuse looks different. Bent frames, cracked booms, seized cylinders, and missing undercarriage components indicate the machine was pushed beyond its limits or neglected. Abuse compounds: one failure triggers others.
Imminent failure shows specific warning signs:
- Hydraulic cylinders that drift (slowly extend or retract on their own) signal internal seal failure
- Tracks that slip or derail indicate worn sprockets or misaligned frames
- Engines that overheat within minutes suggest cooling system failure or internal blockage
- Hydraulic fluid that's black or smells burnt means the system is breaking down internally
When you encounter these signs, the repair cost often exceeds the machine's remaining useful life. Walk away unless the price reflects a complete rebuild budget.
Frequently Asked Questions
What are the most common signs of wear on a used excavator?
The most common signs of wear on used excavators include visible rust and corrosion on the boom and bucket, hydraulic leaks beneath the machine, uneven track wear, and engine noises during operation. Hydraulic fluid that appears dark or contains sludge indicates heavy use or poor maintenance. Cracks in welds, dents in the undercarriage, and slow cylinder response also signal significant wear. High operating hours combined with poor service records suggest accelerated deterioration.
How do you inspect an excavator undercarriage for wear?
Start by checking track tension, there should be minimal slack when measured at the midpoint. Look for cracks or breaks in the track links and examine the rollers and idlers for unusual wear patterns or damage. Inspect the frame welds for cracks, especially near stress points. Check for mud, oil, or debris buildup that could hide damage. Examine pins and bushings for corrosion or excessive play. Document any asymmetrical wear, which indicates alignment issues or abuse.
What should I check on a used excavator before buying?
Before purchasing, verify the complete service history and operating hours. Inspect the hydraulic system for leaks, check fluid color and clarity, and test all cylinders for smooth response. Examine the engine for unusual noises, vibrations, or overheating signs. Look for visible damage, rust, and cracks in the boom and bucket. Test the swing bearing for smooth rotation and listen for grinding sounds. Run a full test drive under load to confirm bucket operation, slew speed, and track performance. Request an independent inspection if possible.
How can distinguishing normal wear from abuse help in negotiation?
Normal wear appears gradual and uniform across components, while abuse shows concentrated damage, bent parts, or catastrophic failure patterns. Machines with consistent maintenance records and even wear patterns command higher prices and justify less negotiation. Evidence of abuse, such as deep gouges, broken welds, or seized components, significantly reduces value and justifies lower offers. Understanding the difference helps you justify your offer to the seller and avoid machines requiring expensive repairs that erode your profit margin.
Buying a used excavator requires more than a quick visual scan. At Ironmartonline, we help equipment buyers and sellers connect with confidence. Our platform reaches millions of potential buyers globally, and we understand the importance of transparent machine condition reporting. When you're ready to sell equipment or find your next machine, proper inspection protects your investment and ensures fair pricing across our nine specialized platforms.